Dashboard
Your workspace at a glance: apps, usage, and shortcuts
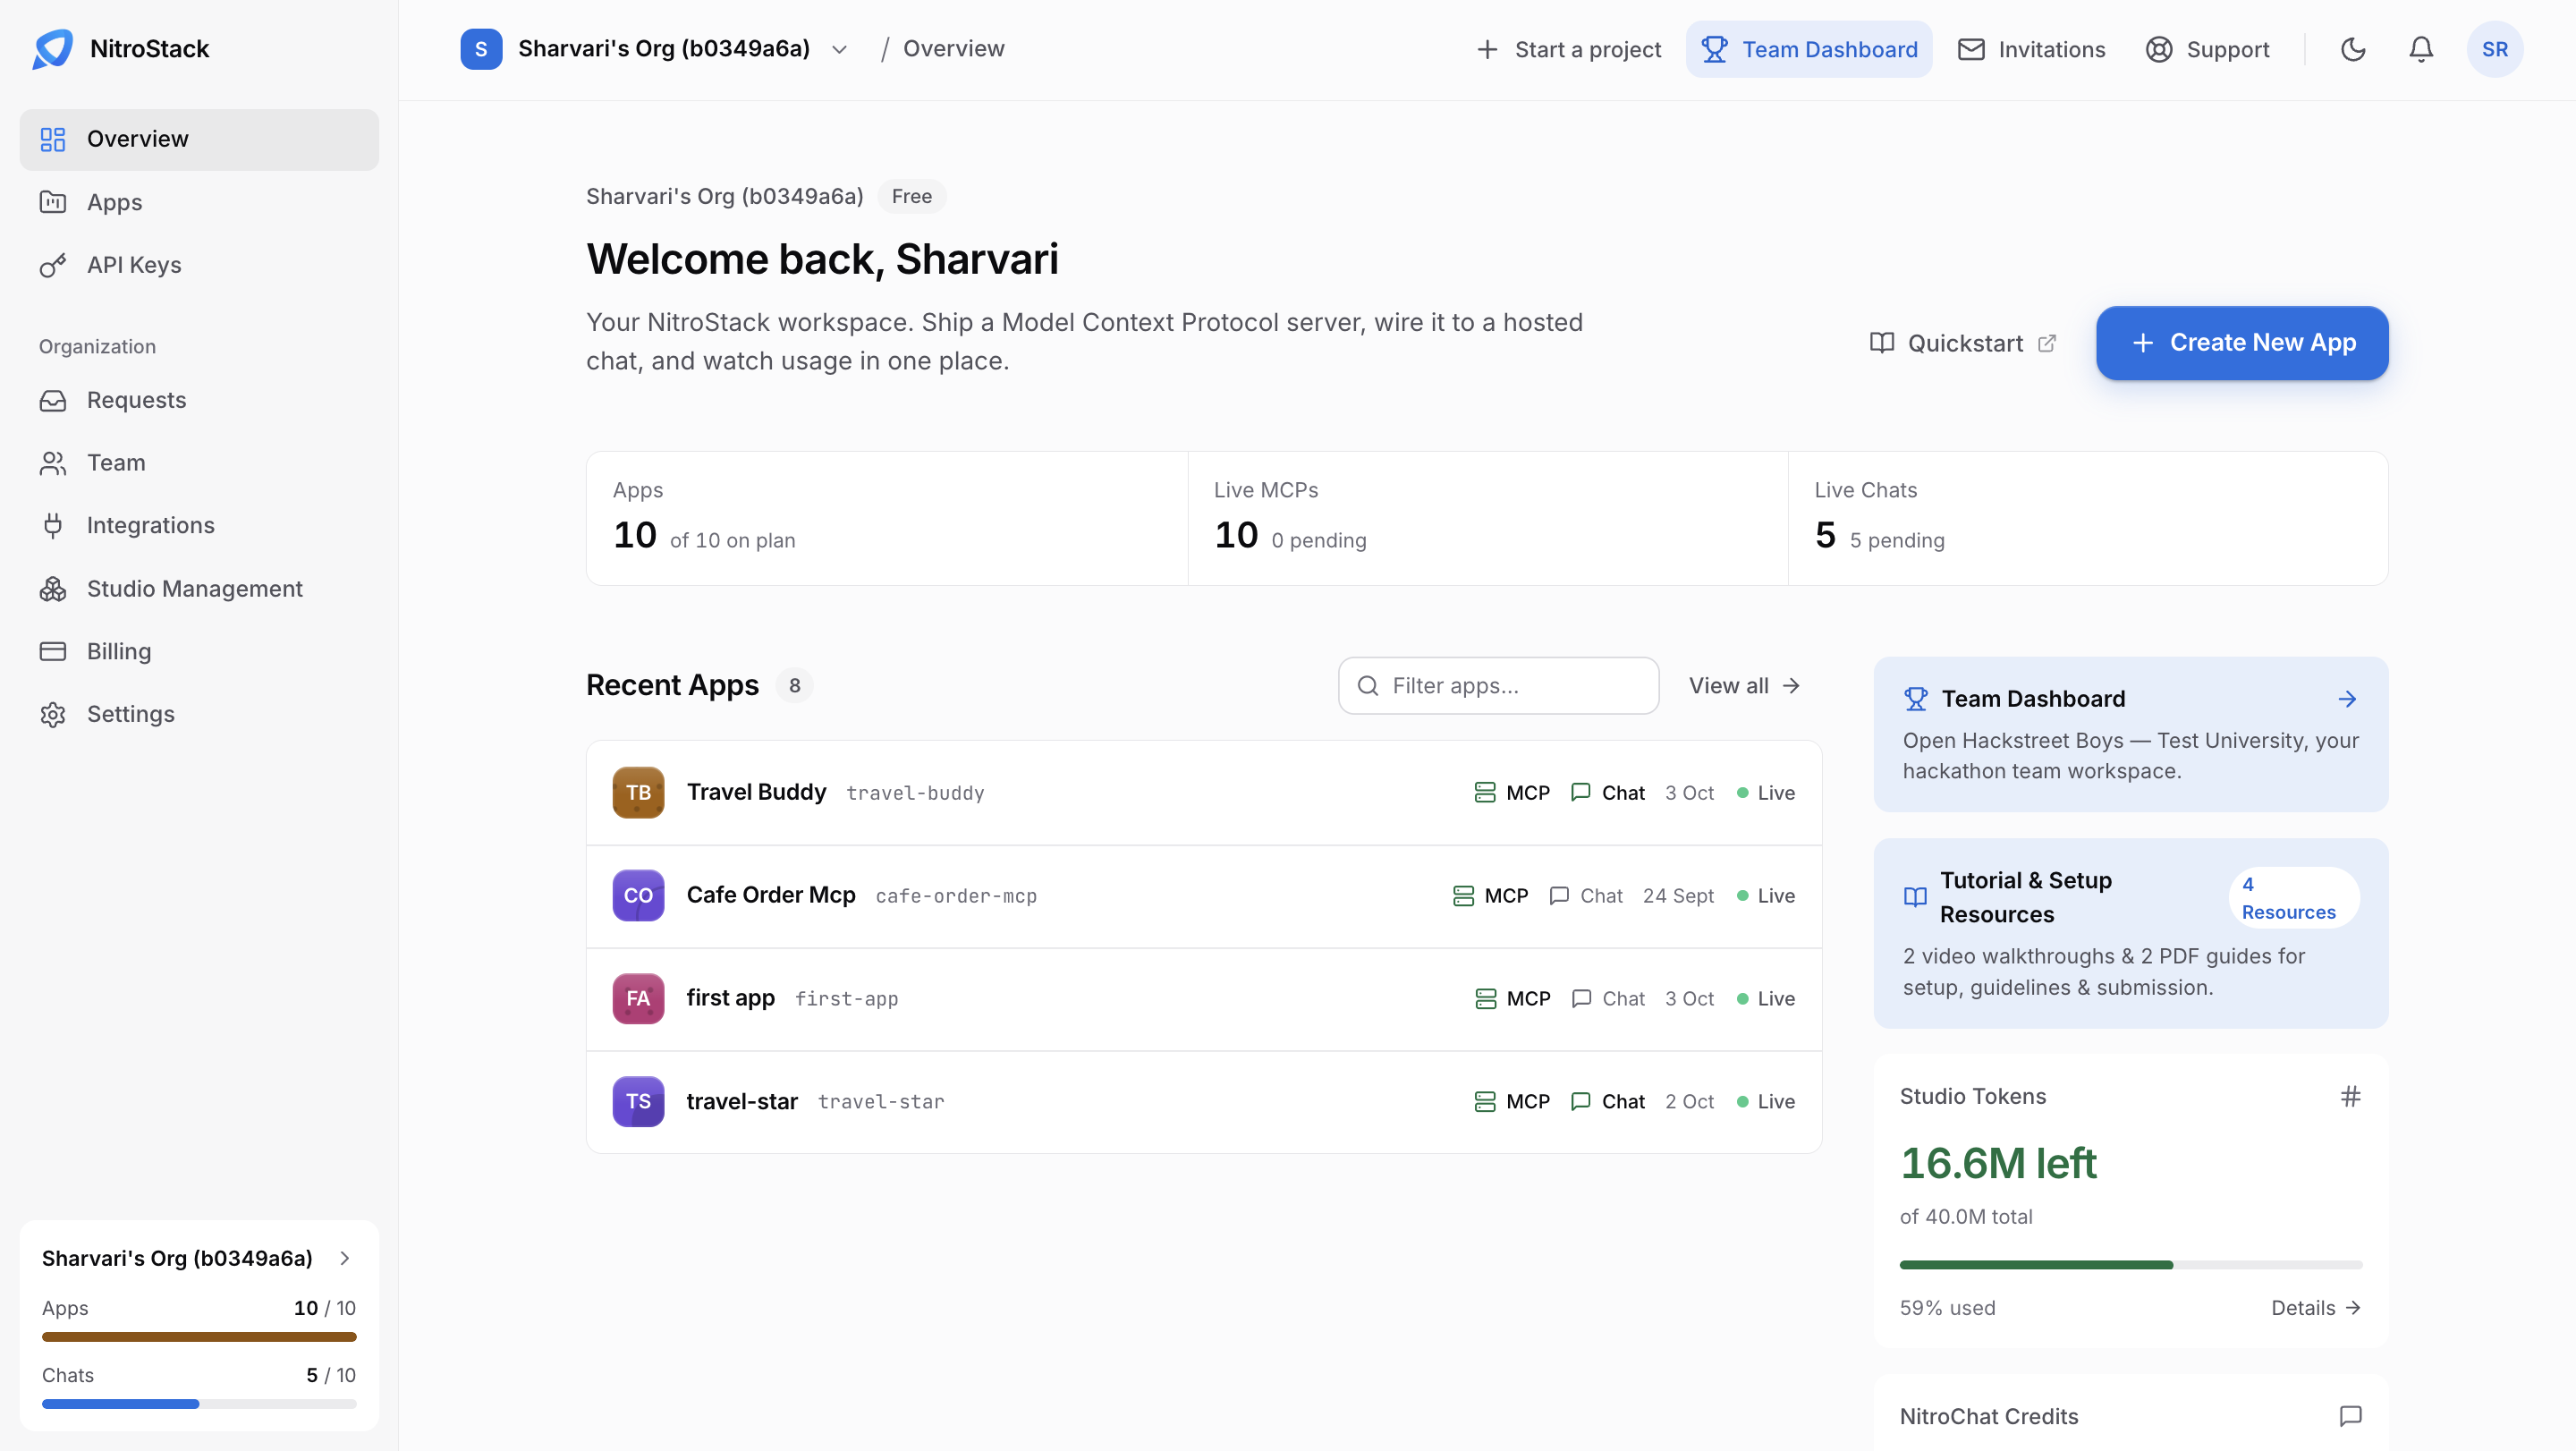
The dashboard is the first page you see after you sign in to NitroCloud. It shows every app in your organization, how much of your plan you've used, and links to the rest of the console.
The top bar
The bar across the top is the same on every organization page.
| Item | What it does |
|---|---|
| Organization switcher | Shows the organization you're working in. Click it to switch to another one. |
| Start a project | Starts a new project in the current organization. |
| Team Dashboard | Opens the hackathon workspace, for an organization taking part in a team event. It isn't the app list. |
| Invitations | Invitations you've received to join other organizations. Invitations you send are on Teams. |
| Support | Get help from the NitroStack team. |
| Theme toggle | Switch between light and dark mode. |
Plan counters
Three counters sit under the welcome message:
- Apps is how many apps you've created, out of the number your plan allows.
- Live MCPs is how many MCP servers are deployed and running. The number after it counts the ones still pending.
- Live Chats is how many hosted chats are running, with the pending count after it.
The same app and chat counts appear at the bottom of the sidebar, as bars, so you can see them from any page.
Recent apps
Recent Apps lists the apps you worked on last. Each row shows the app's name and slug, whether it has an MCP server and a chat, when it last changed, and whether it's live. Use Filter apps to search the list, or View all to open Apps.
To create an app from here, click Create New App. Quickstart opens the getting-started guide.
Usage cards
The cards on the right track what you've used this period:
- Studio Tokens is the AI usage available to NitroStudio across your organization. Studio management sets who can use it.
- NitroChat Credits is what your hosted chats have spent, out of what your plan includes.
Above them, Team Dashboard and Tutorial & Setup Resources link to your team's workspace and to video walkthroughs and guides.
To create an app you'll deploy, use Create New App on the dashboard; Start a project in the top bar is a different path.
Studio tokens and NitroChat credits
Studio Tokens is the pool NitroStudio draws from for the whole organization. To give a member access, turn it on in Studio management. The card is a summary: the balance and top-ups are on Studio usage.
NitroChat Credits is what your hosted chats spend on model calls. Its top-ups are on NitroChat usage.
Both start on free token credits. Your first paid top-up moves the organization to dollar billing, and from then on the member limits in Studio management apply.
Deploy from the dashboard
The dashboard is where you deploy. Prepare the project first, then create an app and link your code.
Prepare your project
Before deploying, check that your server runs over HTTP, because that is how NitroCloud serves it.
npm start builds the project and serves it at http://localhost:3000/mcp, the same way it runs in production:
npm startTo produce a clean archive of your project, without node_modules, build output, or .env files, use pack:
nitrostack-cli packNitroCloud recognizes a Python NitroStack app when nitrostack appears in pyproject.toml (or requirements.txt) or your code imports it. Make sure your project has:
| Requirement | Why |
|---|---|
pyproject.toml at the project root (or one folder deep) | Dependencies are installed with uv. A uv.lock is used when present |
nitrostack listed as a dependency | Lets NitroCloud pick the Python build |
main.py as the entry point | The container runs python main.py |
MCP_TRANSPORT_TYPE=http support | The container sets HOST=0.0.0.0, PORT=3000 and MCP_TRANSPORT_TYPE=http for you |
No Dockerfile is needed. NitroCloud supplies its own.
# Check the project locally
nitrostack-py validate

# Make sure it runs over HTTP
MCP_TRANSPORT_TYPE=http nitrostack-py start
Create and deploy the app
Push your project to GitHub, then in the NitroCloud dashboard:
- Sign in and click Create New App. New to NitroCloud? Create a free account first.
- Install the NitroStack GitHub App from Integrations, if your organization hasn't yet.
- Open the app's Deployments page and link your repository, or upload the project as a
.zipfile. - Add environment variables, for example
API_KEY,JWT_SECRET, and any OAuth settings.
Your MCP server is live at the URL on its MCP page. Point your MCP client at https://<your-app-url>/mcp.
Deploy from the dashboard, not the CLI
The NitroStack CLIs don't currently ship login or deploy commands. Deployment to NitroCloud happens from the dashboard.
Update your server
With a linked repository, every push deploys a new version. Otherwise, upload a new .zip from Deployments. To change configuration, edit the environment variables and redeploy. Never commit .env.